One of the great things about working for an organisation that supports such a wide range of customer types is that I’m constantly adding to my computer support knowledge-base in my efforts to find solutions for clients.
Here’s a classic example; John, a small business client from Ardross, was telling me that, while most of his Facebook Friends were family and genuine friends, he also had many that were only business acquaintances. Consequently, he felt uncomfortable making status updates of a personal nature because he wasn’t always sure they would be appropriate for his business acquaintances to see. I had an inkling that it was already possible to manage this via built-in Facebook features, so off I went researching.
Better than expected
About a year ago, Facebook released their “Improved Friend List” feature. I’m sorry to tell you that it doesn’t actually improve your friends (bit misleading, Facebook! ![]() ), but it turns out that it does improve the task of managing your lists of friends. And not only is it simpler to use than I thought it would be, but its also more powerful.
), but it turns out that it does improve the task of managing your lists of friends. And not only is it simpler to use than I thought it would be, but its also more powerful.
Its possible to set up as many different groups of friends as you like (you can allocate individual friends to multiple groups, too) and, once done, this gives you two great benefits;
- You have the option to only see the status updates of friends in a specific group, and
- You can make status updates that only friends in a specific group can see.
The first option is an unexpected bonus for me because I have the occasional old friend that I really want to keep in touch with, but I just can’t tolerate the sheer quantity of drivel that they post (I’m very sentimental but I honestly don’t need to know what they’re having for breakfast every day).
There are 3 main types of lists, the standard lists, Smart lists and custom lists:
1. Standard lists
Facebook creates the “Close Friends”, “Acquaintances” and “Restricted” lists for every account.
- Close Friends. This one is kind of obvious. You put your best friends in here (or for those younger than me, your BFFs). You will see all the status updates of anyone you put in this list and you will be notified via the Notification list at the top of the Facebook page when they have posted.
- Acquaintances. These are the people that you want to be friends with, but you don’t really feel that you are particularly close to. You won’t see status updates from these people unless they are important changes such as their relationship status changing to “Married” or their location changing to another city.
- Restricted. Most people have “friends” that they’ve added to Facebook only out of social obligation. Bosses often fall into this category. People in the Restricted list can only see your Public posts or posts that you tag them in.
2. Smart lists
Facebook also creates some special lists just for you. These will contain all the friends, for example, in the same city as you… or all the friends who went to the same high school as you. It works these lists out from information that you and your friends have put in your Facebook profiles.
3. Custom lists
If none of the above suit your needs, then you can make your own lists. I created one called “Dexter Fans” so that I can make posts just to my friends who like the TV series, Dexter.
Setting up your friends lists
Okay, on to the practical lesson. First of all, click on the Facebook “Home” button to make sure you’re not in your timeline view.

Look at the bottom of the left-column for “FRIENDS” and hover your cursor over that word.
You will see the word “MORE” appear to the right so click on it. If you can’t find it, click here.
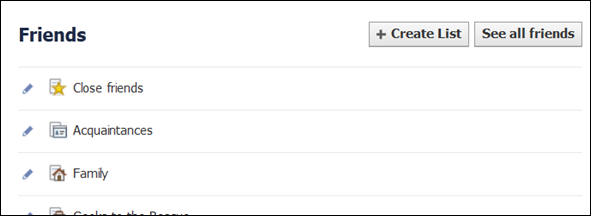
A list of all your lists will appear in the main Facebook panel. It will already have the standard lists plus whatever Smart lists Facebook worked out were relevant.

You can see from the above picture that if you wanted to create your own custom list, all you’d have to do is click on the “+ Create List” button.
BE VERY CAREFUL 1: None of your friends can tell when you add them to a list, but if you make a post to that list, the people who are able to read that post can also see the name of that list. So, its probably not a good idea to put all your friends with halitosis into a list called “Bad Breath”… unless this is your not-so-subtle way of getting the message across to them.
Favourites

It’s going to get old pretty fast having to scroll down to FRIENDS each time you want to see your lists.
To get around this, you can put your most commonly used lists in your FAVOURITES. These appear at the very top of the left-hand column.
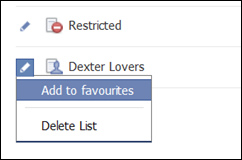
Just click on the pencil icon at the left of any list you want to include in FAVOURITES and select “Add to favourites”.
Adding friends to a list
Okay, so you’ve created all your lists , now how do you get friends in and out of them?

Below, I’ve selected my Dexter Fans list. You can see over at the right-hand side I’ve clicked on the “Manage list” button and I’m about to click on the “Edit List” option.

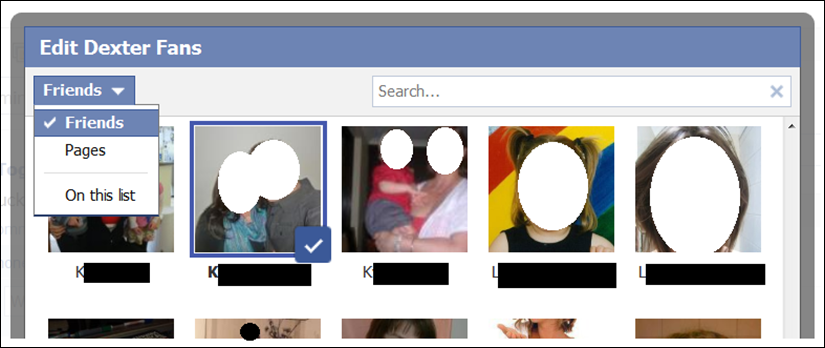
Having done that, you’ll see something similar to the following. Now, if you click on the “Friends” drop down box, you will have two choices. You can click on “On the list” and this will show only the friends who make up this particular list or you can click on “Friends” and you will see your entire list of Facebook friends so that you can select and deselect the ones you want in the list (the ones with the tick in the bottom-right corner of their picture are part of the list).
Using lists
Now you have all your lists set up, there are two things you can do with them.
Viewing:
If you want to just see the posts that people in a particular list have made, click on that list in your Favourites. While viewing that list, if you make any posts yourself, they will only be seen by the people in that list. If you want to go back to a default view, you can click on the Home button.
BE VERY CAREFUL 2: Whichever list you select to post to will stay selected until you change it. In other words, every post you make continues to go to the same list until you select another list or until you click on Home.
BE VERY CAREFUL 3: When you click on Home, it takes you back to whatever you have set as the default view in your Facebook Privacy Settings. It will be quite embarrassing if you were posting to your Close Friends list and then clicked on Home but didn’t remember that this takes you back to your general friends list until after you had made a nasty comment about someone who is in your general friends list.
Posting:
If you want to make a post to a specific list when you are viewing the general feed, you just need to click on the “What’s on your mind?” status box and select the correct list from the “Audience Selector”. Below you can see the Dexter Fans list has been selected – if you click on the arrow to the right of the selection, it will show you all your lists.
Again, be mindful of the “BE VERY CAREFUL 2” warning, above.

Let us know
We’d love to hear what you think. Please offer us your thoughts, opinions and suggestions below in the “Speak your mind” section.
If you’d like to be informed whenever new articles are added to this website, please “Like” the Geeks to the Rescue Facebook page and you will see updates in your newsfeed.

Ok, got the friends and list thing….I created a few lists and added people to it, as i understand it though…they all now by default belong to “friends” and the list I put them in.
So they can see my general posts and also the posts in their respective list. How can I keep them in their list but remove them from the default “friends” I only want to associate with certain groups of people through the list and I don’t want them to see my general posts….
Hi James,
As far as I know, the only way to remove people from the Friends list is to put them into the Restricted list.
A “general” post by definition would be for everyone who is your Facebook friend, so if you only want to associate with certain groups of people, you simply cannot make general posts. For you, every time you make a post, you will have to pick the appropriate list that only contains people that you wish to be able to see that post.
Hope this clarifies your issue for you.
Can a friend be in more than one list?
Yes, definitely.